CapCut Velocity Edit Tutorial for Beginners Step by Step Guide
Velocity editing has become one of the most powerful visual techniques in modern short form video content. Whether you are creating cinematic reels, gaming edits, travel montages, dance clips, or promotional videos, velocity effects can dramatically enhance emotional impact and viewer retention.
In this comprehensive guide, you will learn how to create professional velocity edits using CapCut. This tutorial covers beginner fundamentals, advanced curve manipulation, beat syncing strategies, motion blur optimization, export settings, and common professional mistakes to avoid.
What Is Velocity Editing in CapCut
Velocity editing, often referred to as speed ramping, is a technique where the speed of a video clip changes dynamically over time. Instead of maintaining a constant playback speed, the clip accelerates and slows down smoothly according to a custom curve.
In CapCut, velocity editing works through a curve graph system. This system allows you to:
• Add multiple speed control points
• Increase speed at specific moments
• Create smooth slow motion effects
• Design cinematic pacing
• Control the rhythm of storytelling
Velocity editing is commonly used in:
• Travel vlogs
• Sports highlights
• Dance performances
• Fashion transitions
• Gaming montages
• Motivational reels
• Brand promotional ads
The goal is not just to change speed randomly, but to guide viewer emotion and attention using controlled motion dynamics.
Why Velocity Editing Improves Audience Engagement
Modern audiences have short attention spans. Static clips with flat pacing often fail to hold interest. Velocity editing solves this problem by introducing visual rhythm and intensity.
Here is why it works:
1. It Creates Emotional Impact
Speed increases build excitement. Slow motion creates drama. Together, they amplify emotion.
2. It Syncs Visuals with Music
When speed ramps match audio beats, the edit feels intentional and professional.
3. It Highlights Important Moments
You can slow down impact shots or speed through less important sections.
4. It Improves Watch Time
Dynamic pacing keeps viewers watching until the end.
5. It Makes Basic Footage Look Cinematic
Even simple walking shots can look premium when combined with controlled velocity ramps.
Search engines and social media algorithms reward engaging content, making velocity editing not only a creative skill but also a growth strategy.
System Requirements for Smooth Velocity Editing
Velocity editing can be demanding because it combines speed changes, motion blur, transitions, and effects.
For optimal performance:
• Keep your CapCut app updated
• Close background applications
• Use a device with sufficient RAM
• Lower preview resolution while editing
• Avoid stacking too many heavy effects
If your timeline lags:
• Reduce playback quality
• Split clips into shorter segments
• Avoid extreme speed spikes
Smooth editing ensures accurate speed curve adjustments and better final output quality.
Step by Step CapCut Velocity Edit Tutorial
Step 1: Import High Quality Footage
Open CapCut and create a new project.
Import clips that contain visible motion such as:
• Running
• Turning
• Jumping
• Camera pans
• Object movement
• Hand gestures
Velocity edits work best when there is natural movement in the footage. Static scenes will not produce dramatic results.
For best quality:
• Use 60fps footage if possible
• Record in 1080p or 4K
• Ensure proper lighting
High frame rate footage allows smoother slow motion without frame tearing.
Step 2: Trim and Clean Your Timeline
Before applying any speed effects:
• Remove unwanted segments
• Cut out shaky sections
• Keep only impactful motion
This preparation step ensures that your velocity curve aligns perfectly with meaningful moments.
Professional editors always structure the timeline before adding effects.
Step 3: Apply Curve Velocity
- Tap on the clip
- Select Speed
- Choose Curve
- Tap Custom
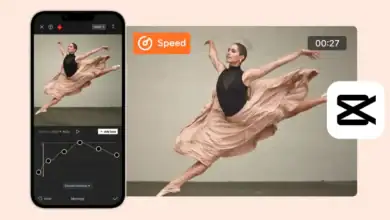
You will now see the velocity graph interface.
This graph allows full manual control over speed changes. The horizontal axis represents time, and the vertical axis represents playback speed.
Understanding this graph is essential to mastering velocity editing.
Understanding the Velocity Curve Graph in Detail
The velocity graph is the core of speed ramp editing.
• Higher graph point means faster playback
• Lower graph point means slower playback
• Flat line means constant speed
• Sharp angle means sudden change
• Smooth curve means cinematic transition
For professional results:
• Avoid sharp vertical spikes
• Use gradual slopes
• Keep transitions smooth
• Maintain rhythm with audio
Smooth curves create professional edits. Sudden changes often look amateur unless used intentionally for glitch effects.
Step 4: Create a Basic Cinematic Speed Ramp
To create a simple and effective ramp:
- Add three points on the graph
- Keep first point at normal speed
- Raise middle point slightly
- Lower final point for slow motion
This creates a fast to slow cinematic effect.
For even better results:
• Add easing between points
• Avoid extreme 5x speed spikes
• Keep slow motion between 0.3x to 0.5x
Subtle control produces smoother visuals.
Step 5: Sync Velocity with Music Beats
Beat syncing transforms good edits into professional edits.
Add your background music and zoom into the waveform.
Identify:
• Beat drops
• Bass kicks
• Instrument changes
• Lyric transitions
Place velocity peaks slightly before the beat drop. Then reduce speed exactly at the drop.
This technique creates visual tension followed by release, making the edit feel intentional and rhythmic.
Step 6: Add Motion Blur for Realism
When speed increases, motion blur adds realism and smoothness.
To apply:
• Go to Effects
• Search Motion Blur
• Apply moderate intensity
Motion blur reduces choppiness during fast transitions.
However:
• Do not overuse
• Keep blur natural
• Avoid blurring slow motion segments excessively
Balanced motion blur enhances cinematic appeal.
Advanced CapCut Velocity Editing Techniques
Multi Point Velocity Design
Instead of using three points, try five to seven.
Example structure:
• Start normal
• Gradually accelerate
• Peak at action moment
• Rapid drop to slow motion
• Gradual return to normal
This creates dynamic storytelling pacing.
Whip Pan Velocity Transition
- Record a quick camera whip.
- Apply speed increase during the whip motion.
- Add transition at peak speed.
This hides the cut and creates seamless transitions between scenes.
Reverse Velocity Bounce Effect
- Duplicate the clip.
- Reverse the second clip.
- Apply opposite speed curve.
This creates a bounce rewind effect commonly used in dance edits.
Mask Combined with Velocity
Use masking to blend two clips during speed ramp.
This works great for:
• Outfit change transitions
• Before and after reveals
• Location swaps
Velocity hides the cut while masking blends visuals.
Professional Workflow Tips
- Always edit to music
- Keep velocity subtle
- Avoid random spikes
- Use consistent pacing
- Color grade after velocity adjustments
- Preview multiple times before export
Professional editing is about refinement and subtle adjustments.
Common Mistakes to Avoid
Overcomplicated Graphs – Too many points make edits messy.
Extreme Speed Values – Going beyond 5x speed often looks unrealistic.
Ignoring Audio Timing – Unsynced ramps feel random.
Using Low Frame Rate Footage – 30fps clips may stutter when slowed.
Overusing Effects – Stacking too many overlays reduces clarity.
Best Export Settings for Velocity Edits
After finishing your project:
• Export at 1080p or 4K
• Choose 60fps if original footage supports it
• Select high bitrate
• Avoid excessive compression
High export quality preserves smooth motion transitions.
Final Thoughts
Velocity editing in CapCut is more than a trend. It is a storytelling technique that transforms basic footage into cinematic experiences. When applied correctly, speed ramps guide viewer attention, amplify emotion, and improve content quality dramatically.
Mastering velocity editing requires practice, rhythm awareness, and smooth curve control. Focus on subtle adjustments, beat synchronization, and motion consistency. Over time, your edits will look polished and professional.